
You’ve been oiling your hair religiously for months. Coconut oil on Sunday nights. Argan oil before every wash. Maybe even overnight treatments with castor oil. But your hair still feels dry, looks dull, and tangles more than it used to. You’re doing everything the hair oiling tutorials say to do. So why isn’t it working?
Here’s what those tutorials don’t tell you: oil can’t penetrate mineral-coated hair. If you’re living in a hard water area, the calcium and magnesium buildup on your strands creates a barrier that oil simply sits on top of. You’re not getting the nourishment, the shine, or the protection. You’re just getting greasy hair that still feels straw-like underneath. This article contains affiliate links. See our affiliate disclosure for details.
Hair oiling is a genuinely beneficial practice when done correctly and in the right conditions. But in hard water climates, the sequence matters more than the ritual itself. Let’s break down when hair oiling helps, when it’s actively holding you back, and how to make it work in challenging water conditions.
Key Takeaways
• Hair oiling works only on clean, mineral-free hair; oil cannot penetrate calcium and magnesium buildup from hard water
• Pre-wash oil treatments should be applied to mid-lengths and ends, not the scalp, unless treating specific scalp dryness
• Chelating shampoo must come first to remove mineral coating before oil can deliver any benefits
• Coconut oil, argan oil, and jojoba oil have different molecular structures that affect penetration and protection differently
• Over-oiling in humid climates can attract dust and pollutants, creating more buildup rather than protection
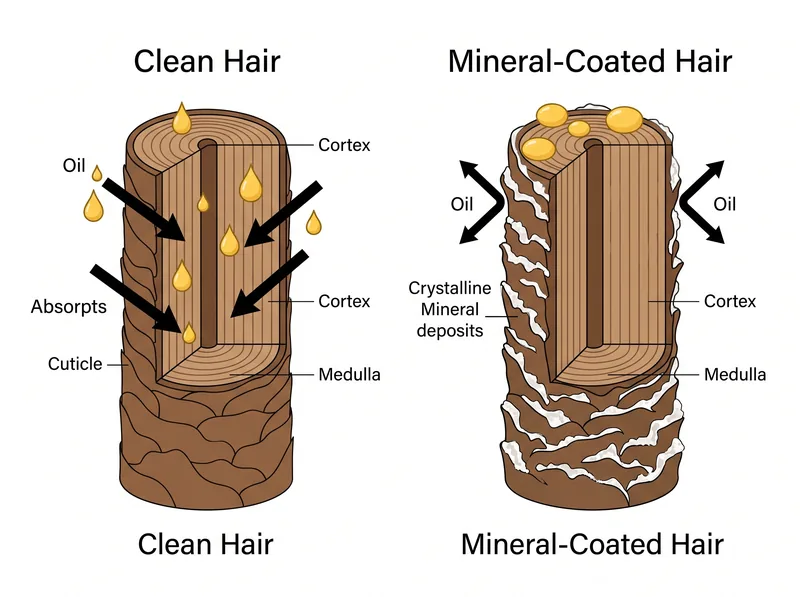 Oil penetrates clean hair cuticles (left) but sits on top of mineral-coated strands (right), unable to deliver benefits.
Why Your Hair Oiling Routine Stopped Working
Hair oiling is an ancient practice with real science behind it. Certain oils can penetrate the hair cortex, reduce protein loss during washing, and protect against mechanical damage. But all of that depends on one critical factor: the oil has to be able to reach the hair shaft.
In hard water areas, every shower deposits a thin film of calcium and magnesium minerals onto your hair. These minerals bind to the hair cuticle, creating a rough, chalky coating. When you apply oil to mineral-coated hair, the oil can’t get through. It sits on top of the buildup, making your hair feel greasy at the surface while remaining dry and brittle underneath.
This is why women moving to the Gulf region often report that their longtime hair oiling routines suddenly stop working. The routine didn’t change. The water did. The mineral barrier prevents absorption, and you end up with the worst of both worlds: oil residue on the outside, dehydration on the inside.
If you’ve noticed your hair feels coated rather than nourished after oiling, or if it looks shiny when wet but dull and tangled when dry, mineral buildup is likely blocking your oil from doing its job. The solution isn’t more oil or different oil. It’s removing the barrier first.
The Right Sequence: Chelation Before Oiling
The fix is simple but non-negotiable: you have to remove mineral buildup before you apply oil. This means using a chelating shampoo like Regrowth+ as the first step in your hair care routine, not after oiling.
Here’s the sequence that actually works in hard water conditions: Start with dry hair. Apply your chelating shampoo directly to dry hair, focusing on the mid-lengths and ends where mineral buildup accumulates most. Massage it through, let it sit for 2-3 minutes, then rinse thoroughly. This removes the calcium and magnesium coating. Now your hair cuticles are clean and receptive.
After chelation, you can apply your pre-wash oil treatment. The oil will actually penetrate because there’s no mineral barrier blocking it. You’ll feel the difference immediately, the oil absorbs instead of sitting on top. Your hair feels softer, not slicker. When you wash it out, your hair has actually been nourished rather than just temporarily coated.
Some women prefer to oil after washing instead of before. That works too, as long as the chelation step happens first. The key principle is the same: clean hair accepts oil, mineral-coated hair repels it. Get the sequence right, and hair oiling delivers the benefits you’ve been reading about. Get it wrong, and you’re wasting time and product.
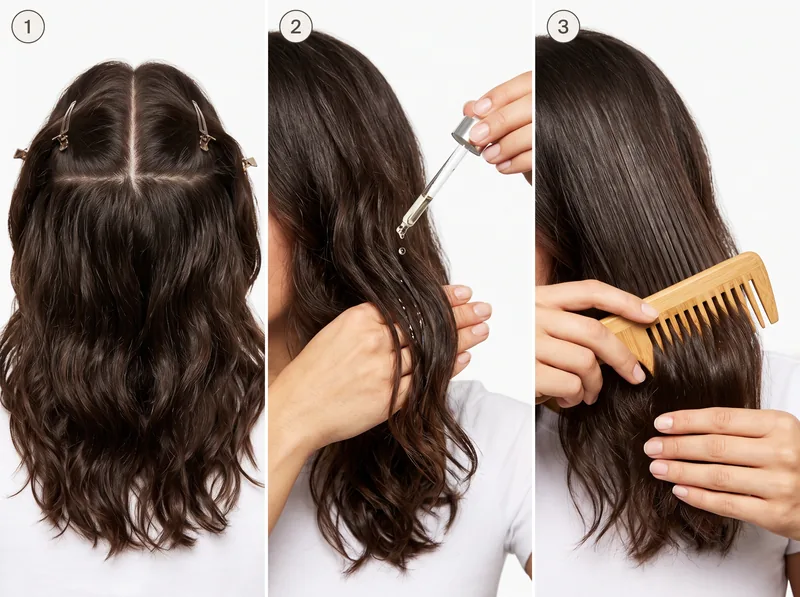 Proper application technique: section hair, apply to mid-lengths and ends first, then distribute with fingers or wide-tooth comb.
Which Oils Actually Penetrate Hair (And Which Just Coat)
Not all oils are created equal when it comes to hair penetration. The molecular structure matters. Oils with smaller molecules and specific fatty acid profiles can penetrate the hair cortex. Oils with larger molecules sit on the surface as sealants.
Coconut oil is one of the few oils proven to penetrate the hair shaft. Its high lauric acid content gives it a low molecular weight and an affinity for hair protein. Research published in the Journal of Cosmetic Science showed that coconut oil reduces protein loss during washing better than mineral oil or sunflower oil. It actually gets inside the hair structure.
Argan oil, despite its popularity, primarily works as a surface sealant. It’s rich in oleic acid and vitamin E, which smooth the cuticle and add shine, but it doesn’t penetrate deeply. That’s not necessarily bad, sealants have their place, but if you’re expecting deep conditioning from argan oil alone, you’ll be disappointed. It’s a finishing oil, not a treatment oil.
Jojoba oil is technically a wax ester, not a triglyceride, and it closely mimics human sebum. It absorbs moderately well and is excellent for scalp application because it doesn’t clog pores. For hair length, it provides light conditioning without heaviness. Castor oil is thick and sticky, high in ricinoleic acid, and works best as a scalp treatment for dryness or flaking rather than a hair-length conditioner.
In hard water climates, coconut oil and jojoba oil are your best bets for pre-wash treatments because they have some penetrative ability. But remember: even these oils can’t work their way through mineral buildup. Chelate first, then oil.
When Hair Oiling Makes Things Worse
There are situations where hair oiling actively backfires, especially in hot, dusty climates. If you’re applying oil to already-dirty hair, or using too much oil in humid conditions, you’re creating a magnet for environmental pollutants.
Oil on the hair surface attracts dust, sand, and airborne particles. In the Gulf, where dust storms are common and outdoor air quality fluctuates, oiled hair can accumulate grit quickly. This creates a sandpaper effect, the very thing you’re trying to avoid. The oil you applied for protection ends up holding abrasive particles against your hair shaft, causing more mechanical damage than if you’d left your hair alone.
Over-oiling is another common problem. More oil doesn’t mean more benefit. Once the hair has absorbed what it can hold, additional oil just sits on top, making hair look greasy and attracting buildup. For most hair types, a few drops of oil on the mid-lengths and ends is sufficient. If you’re using more than a teaspoon of oil for shoulder-length hair, you’re probably overdoing it.
Scalp oiling can also backfire if you have an oily scalp or scalp conditions like seborrheic dermatitis. Adding oil to an already-oily scalp can worsen flaking and irritation. The American Academy of Dermatology recommends focusing oil treatments on hair length, not the scalp, unless you’re specifically treating scalp dryness.
If your hair feels heavier, looks duller, or tangles more after you started an oiling routine, that’s a sign it’s not working for your current conditions. Don’t push through hoping it’ll improve. Reassess your water quality, your application technique, and whether you’re chelating before oiling.
How to Oil Hair Correctly in Hard Water Conditions
The technique matters as much as the product. Here’s the step-by-step for hair oiling that actually works in challenging water conditions.
Start with clarified hair. Use your chelating shampoo to remove any existing mineral buildup. Your hair should feel clean and slightly squeaky, not coated or slippery. This is your blank slate.
Section your hair into four quadrants. This ensures even distribution and prevents you from over-applying oil to some areas while missing others. Clip each section out of the way.
Apply oil to mid-lengths and ends first, not the scalp. Take one section, apply 3-5 drops of oil to your palms, rub your hands together to warm and distribute the oil, then smooth it through the section from mid-length down. Focus on the ends, which are the oldest and most damaged part of your hair. If you have very dry ends, you can apply a bit more directly to them.
Use your fingers or a wide-tooth comb to distribute the oil evenly through each section. Don’t scrunch or massage aggressively, you want smooth, downward motion that follows the cuticle direction. This helps the oil penetrate and prevents tangling.
Leave the oil on for 30 minutes to 2 hours. There’s no need for overnight treatments unless you enjoy them. Research shows that most oil penetration happens in the first hour. After that, you’re just risking pillow stains and dust accumulation.
Wash out with a gentle sulfate-free shampoo. You don’t need to use your chelating shampoo again, you already removed the minerals. A regular cleansing shampoo will remove the oil without stripping your hair. One lather should be enough if you didn’t over-apply the oil.
Repeat this routine once a week or every other week, depending on your hair’s needs. More frequent oiling isn’t necessarily better, especially in humid climates where oil can attract environmental buildup.
Adjusting Your Routine for Climate and Hair Type
Your hair oiling routine should adapt to your environment and your hair’s specific needs. What works in a temperate climate might be too heavy for a hot, humid one. What works for thick, coarse hair might weigh down fine hair.
For fine hair in humid climates, use lighter oils like jojoba or argan in very small amounts. Focus only on the ends, and consider skipping the pre-wash oil in favor of a few drops on damp hair after washing. Fine hair gets overwhelmed easily, and heavy pre-wash oiling can make it look limp and greasy even after washing.
For thick, coarse, or curly hair, coconut oil works well as a pre-wash treatment. You can use more product and apply it more generously through the lengths. Curly hair tends to be drier because sebum has a harder time traveling down the hair shaft, so it benefits more from added oil. Just make sure you’re chelating first to remove any mineral coating that would block absorption.
In extremely hot climates, consider switching to post-wash oiling rather than pre-wash. Apply a small amount of oil to damp hair after washing, focusing on the ends. This gives you the protective and shine benefits without the risk of attracting dust and pollutants during the pre-wash phase.
If you have color-treated or chemically processed hair, coconut oil can help reduce protein loss and protect against damage. Apply it before any chemical treatment and as a regular pre-wash treatment between salon visits. Processed hair is more porous and damaged, so it benefits more from penetrative oils like coconut.
For women dealing with postpartum hair loss or telogen effluvium, gentle scalp oiling with jojoba or coconut oil can help soothe irritation and support scalp health. But it won’t regrow hair on its own, that requires addressing the underlying cause, whether it’s nutritional, hormonal, or environmental.
References
- Effect of mineral oil, sunflower oil, and coconut oil on prevention of hair damage - Journal of Cosmetic Science
- Hair cosmetics: An overview - International Journal of Trichology
- Tips for healthy hair - American Academy of Dermatology